System Overview
System Architecture
The machine learning layer is a Flask server that provides REST APIs to create, train, use machine learning based sensors, which we call virtual sensors. Here is a system diagram.
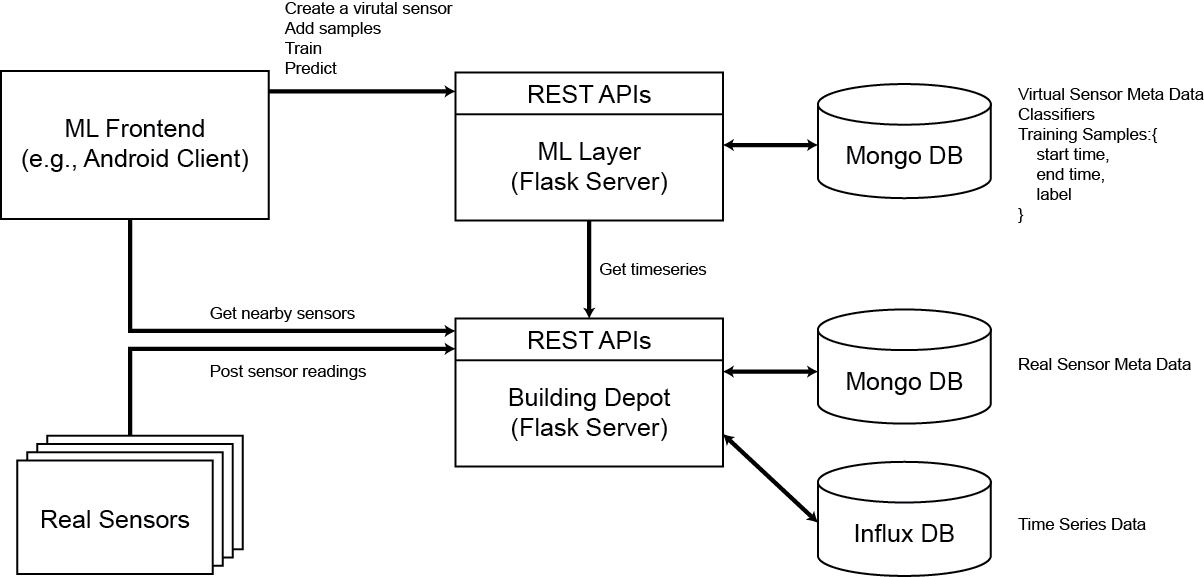
The ML Layer, which is a Flask server, provides REST APIs for ML Front ends. ML Front ends provide user interfaces for users to create, train, and use virtual sensors. See ML Client for Android as an example. See the next section for more details of the sequences of these operations.
The ML Layer stores virtual sensors’ meta data, classifiers, and samples in Mongo DB. For each sample, the ML Layer only stores a start time, an end times, and a label. Time series data is obtained from Building Depot via its REST APIs to train classifiers and to make predictions as needed basis.
Example Scenario
This section describes how the REST APIs are used to train and use classifiers in this GIoTTO Machine Learning Layer.
We assume that enough sensors are already deployed in users’ environment, and that these sensors are property connected to BuildingDepot. Also, we assume that users DO NOT have machine learning knowledge. The process described in this page is implemented in the Machine Learning Front End for Android. Referring to its source code will help understand the procedure well.
In the followings, we create a virtual door sensor that returns either a door is open or closed. We explain the procedure using curl commands so that you can try the process without writing code. We assume that both Building Depot and machine learning layer is running on a server giotto.cmu.edu. Replace this server based on your environment.
Create a Virtual Sensor
First, we need to create a virtual sensor. A virtual sensor is a machine-learning-based sensors in GIoTTO. A virtual sensor uses sensor readings from other sensors as inputs and make predictions based on a machine learning classifier.
When creating a virtual sensor, we need to find real sensors near a virtual sensor that we want to create. Now, let’s assume that the door sensor is for a door in Room1. We query by querying Building Depot with location via a Building Depot’s REST API.
$ curl -X GET http://buildingdepot.andrew.cmu.edu:82/service/api/v1/location=Room1/metadata
This returns
{
  "data": {
    "sensor_1": {
      "building": "NSH",
      "metadata": {
        "location": "Room1",
        "type": "Temperature"
      },
      "name": "c82e86ae-fb89-40c8-879f-d8bad3a7ef8b",
      "source_identifier": "SensorTag001",
      "source_name": "Temperature",
      "tags": []
    },
    "sensor_2": {
      "building": "NSH",
      "metadata": {
        "location": "Room1",
        "type": "Humidity"
      },
      "name": "85105ac7-bfdf-40d4-91c0-df2e91f58e55",
      "source_identifier": "SensorTag001",
      "source_name": "Humidity",
      "tags": []
    },
    "sensor_3": {
      "building": "NSH",
      "metadata": {
        "location": "Room1",
        "type": "Pressure"
      },
      "name": "0152e43a-901e-42ae-ad2f-460e3165d58b",
      "source_identifier": "SensorTag001",
      "source_name": "Pressure",
      "tags": []
    },
    "sensor_4": {
      "building": "NSH",
      "metadata": {
        "location": "Room1",
        "type": "Lux"
      },
      "name": "baa054de-85b6-4ef4-abc4-dd210d76c2fc",
      "source_identifier": "SensorTag001",
      "source_name": "Lux",
      "tags": []
    }
  }
}
Then, we call the machine learning layer’s REST API to create a virtual sensor with name parameters obtained in the previous call. We formatted JSON nicely to make it easy to read. When
$ curl -X POST http://giotto.cmu.edu:5000/sensor -d
        '{
                "name":"Door Sensor",
                "description":"A door sensor at Room #1",
                "labels":[],
                "user_id":"default",
                "sensor_uuid":"",
                "inputs":[
                        "c82e86ae-fb89-40c8-879f-d8bad3a7ef8b",
                        "85105ac7-bfdf-40d4-91c0-df2e91f58e55",
                        "0152e43a-901e-42ae-ad2f-460e3165d58b",
                        "baa054de-85b6-4ef4-abc4-dd210d76c2fc"
                ],
                "training_set":[]
        }'
Returns:
{
        "url":"http:\/\/giotto.cmu.edu:5000\/sensor",
        "method":"POST",
        "ret":"56f97c6aa9705e6202ed7d2f",
        "result":"ok"
}
Add Training Samples
After creating a virtual sensor, we need to provide training samples. A training sample consists of a start time, an end time, and a label. A label is a user-defined string for a state. In the door example, it is either open or close.
To add a sample, we need to specify these three pieces of information. Be aware that the start time and end time are timestamp on a server where the machine learning layer is running. If a system time on a front end (e.g, a smart phone) is synchronized, we can use a timestamp from the front end. However, we recommend to fetch a timestamp from the server to be sure.
To add a open sample, you actually open the door and,
Fetch a timestamp for a start time .. code-block:: bash
$ curl -X GET http://giotto.cmu.edu:5000/time
Returns:
{
        "url":"http:\/\/giotto.cmu.edu:5000\/time",
        "method":"GET",
        "ret":1.459193282185012E9,
        "result":"ok"
}
Then, wait for a few second and fetch a timestamp for an end time using the same API Finally, add a sample with the start time, the end time and a label open using the sensor ID obtained when creating a virtual sensor
$ curl -X POST http://giotto.cmu.edu:5000/sensor/56f97c6aa9705e6202ed7d2f/sample -d
        '{
                "start_time":1.459193282185012E9,
                "end_time":  1.45919335340626E9,
                "label":"open"
        }'
Returns:
{
        "result":"ok",
        "uri":"http:\/\/giotto.cmu.edu:5000\/sensor\/56f97b24a9705e1911016e56\/sample",
        "ret":"56f98722a9705e6235f9e083",
        "method":"POST"
}
Repeat the procedure above at least 5 times for each of open and close to add enough samples for training.
Train a Classifier
Now, we can train a classifier based on the samples collected in the previous step. Call Train with a virtual sensor ID obtained in the first step. When the train API is called, the system extract sensor readings from Building Depot based on start times and end times, extract features from the sensor readings, and add labels to generate a training set. Then, the system trains a random forest classifier with the training set.
$ curl -X POST http://giotto.cmu.edu:5000/sensor/56f97c6aa9705e6202ed7d2f/classifier/train
Returns:
{
        "result":"ok",
        "uri":"http:\/\/giotto.cmu.edu:5000\/sensor\/56f97b24a9705e1911016e56\/classifier/train",
        "method":"POST"
        "message":""
}
At the same time, the system calculate an average of sampling durations over the samples. The average is used as a sampling window when making a prediction using the classifier.
Make a Prediction
Finally call Predict to make a prediction using the trained classifier. In the Predict API, we need to pass a timestamp of a prediction. Then, the system takes sensor readings from the timestamp - sampling window to the timestamp are used as input for the classifier to make a prediction.
$ curl -X POST http://giotto.cmu.edu:5000/sensor/56f97c6aa9705e6202ed7d2f/classifier/predict
Returns:
{
        "result":"ok",
        "uri":"http:\/\/giotto.cmu.edu:5000\/sensor\/56f97b24a9705e1911016e56\/classifier/predict",
        "method":"GET"
        "ret":"open"
        "message":""
}